9.04.2009

8.20.2009

Foreshadowing

My car at WORK Wheels USA where house. Now why would it be there???

8.19.2009

Paint? No. Truck Bed liner.

prep first with a can of duplicolor adhesion promoter, and follow with one full can of this:


the end result is this:


stuff is textured and looks cool, on top of that it is pretty durable and should hold up to some abuse.

rad

8.07.2009

No More Amber

Decided to pull apart the front signals and remove the amber inserts today. Im not a big fan of amber in general, but on a silver car the amber has got to go. I think it makes the signals look much cleaner and more aggressive overall. Now I just need some clear from side markers and ill be good to roll.

Shine Auto Goodies

Got a chance to swing by shine auto a few weeks ago out on ontario, ca. The shop is awesome, huge where house, a bunch of cool FDs and parts. Not to mention Ken the guy running the show down there is a stand up guy. I ended up coming home with the "Street Style" Rear Diffuser and the Low-Pro Spoiler. Pretty stoked to get these painted and on the car!


More pics later of them painted and installed.

Hatch Swap!

After deciding I wanted to rid myself of the stock R1 spoiler and rear windshield wiper, I decided to make a post on RX7club to trade for a base model hatch without them. I got lucky and found a guy who was willing to trade his already silver base hatch for mine, sweet.

Before:


After:

4.28.2009

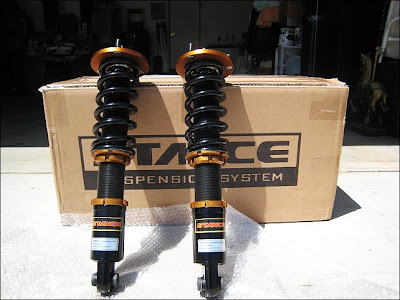
Stance GR+ Coilovers

Alright so after a long break, finally a new update. I managed to scrounge up the cash for some decent coilovers. I had a few different options, but the Stances were the best choice for my price range so I went with them. They are the GR+ model, 15 way adjustable dampening, 12k/12k spring rates blah blah blah. In short, they rule and have completely transformed the way the car feels, and drives. The build quality on the coilovers is outstanding, I could not be happier with them. By far the best mod to the car thus far. Here are a couple pictures for the time being, I need to get some REAL pictures taken now that the car is actually presentable.


1.21.2009

Brake Pad & Fluid Upgrade

Since I had to remove the ABS and bleed the brake system anyhow for the Engine Brace project, I figured why not handle the whole brake situation now. I picked up some EBC Yellow Stuff Brake Pads, and some ATE Super Blue Racing Brake Fluid. Both components are effective at much higher temperatures than the factory equipment, which will benefit my stopping capabilites during the prolonged beatings the car will take at the track, or during spirited driving. Not only will the car stop faster and have eliminated brake fade, but the pedal and brake feel will be much more concise.


In the midst of this project, I decided that the calipers would look a lot nicer if they were cleaned up and painted. So I took all 4 calipers and gave them a layer of black, I think they turned out well.

Before


After


:)

Engine Mount & Torque Brace Install

When the engine was rebuilt initially, I used what I thought were new "factory" mazda motor mounts. Unfortunately I discovered otherwise when I felt how badly the engine & trans moved around. So I decided to go through with an upgrade to some of Banzai Racing's poly urethane mounts. Without pulling the whole motor, this install was a pain to do with just hand tools and a floor jack. I had to jack the motor up from the transmission, and attempt to wedge a socket over the engine mount bracket nuts, all the while hoping that nothing broke from the tension. Long story short, I recommend installing them while the motor is out.

Note: This picture was taken from Banzai Racing's website, this is not my motor.


In addition to the mounts, I decided to pick up Garfinkle's Engine Torque Brace for added stiffness. Even though it was probably unnecessary considering how stiff the mounts were, it's good to have for piece of mind. This was even more of a pain in the ass to install than the motor mounts. The brace has 2 mounting points, one on the frame and one on the intake manifold. In order to install this properly, you need to drill 4 holes in the frame near the fender, and remove the fender & ABS system for ease of install. I also had to drill out the pre-threaded holes in the brace because it didnt line up correctly. After some headache and persuasion, It finally worked out. I guess its worth it for the beefiest engine torque brace around.

Finished Product:


1.19.2009

Modification List

The engine rebuild was finally completed with a fresh engine in June 2008. The real build-up began from then on, here is the list of mods thus far, I will continue to update this as I add parts to the car.

Engine
- 13b Twin Turbo (Converted to Non-Sequential)
- Factory Twin Turbos
- Ported Wastegate
- Moderate Street Port
- Atkins 2mm Apex Seals
- APEX-i Power FC Standalone ECU
- 850cc Primary & Secondary Injectors
- Denso Fuel Pump
- Koyo Aluminum Radiator
- GReddy Pulley Kit
- Racing Beat 6 Puck Clutch
- Fidanza 9.5lbs Flywheel
- Banzai Racing Poly-Urethane Engine Mounts
- Garfinkle Oil Pan Brace
- Garfinkle Engine Torque Brace
- Home-made K&N Intake
- Bönez 3'' Downpipe
- Borla 3'' Resonated Midpipe
- JIC 3'' Titanium Catback Exhaust

Brakes/Suspension

- EBC Yellow Brake Pads
- Stance GR+ Coilovers

Wheels/Tires
- Federal RS-R 255/35/18 F & R
- WORK Emotion XD9 Wheels 18x10 +38 F, +18 R

Interior
- MOMO Steering Wheel
- RX8 Shiftknob
- RX7 Store Aluminum Climate Knobs

Exterior
- 99 Spec Lip
- 99 Spec Tail Lights
- BMW M3 HID Retro-fit
- Shine Auto "RE Amemiya Street Style" Diffuser
- Shine Auto Low Profile Spoiler

It Begins..

So I recently discovered this website, and I thought it would be a cool way to document my on-going Mazda RX-7 project. Not only for myself, but for others to view as well. The ultimate goal of this build, is to end up with a race track worthy, street drivable RX-7.

The project began with a basically bone stock 1993 Mazda RX-7 Touring model that I purchased in 2005, which I bought for a very reasonable price from a family member. When I purchased it, the car had a blown engine (bad coolant & apex seals), had electrical issues, and needed a lot of help due to a negligent previous owner.

Finally in december of 07 I decided to rebuild the blown engine. It was rebuilt with a street port, apex-i power fc standalone, and a bunch more stuff that drained my wallet which I will list later.

Here are some pictures of the car as of 01/19/09. The exterior remains almost completely factory at this point, which I plan to change when funds permit.